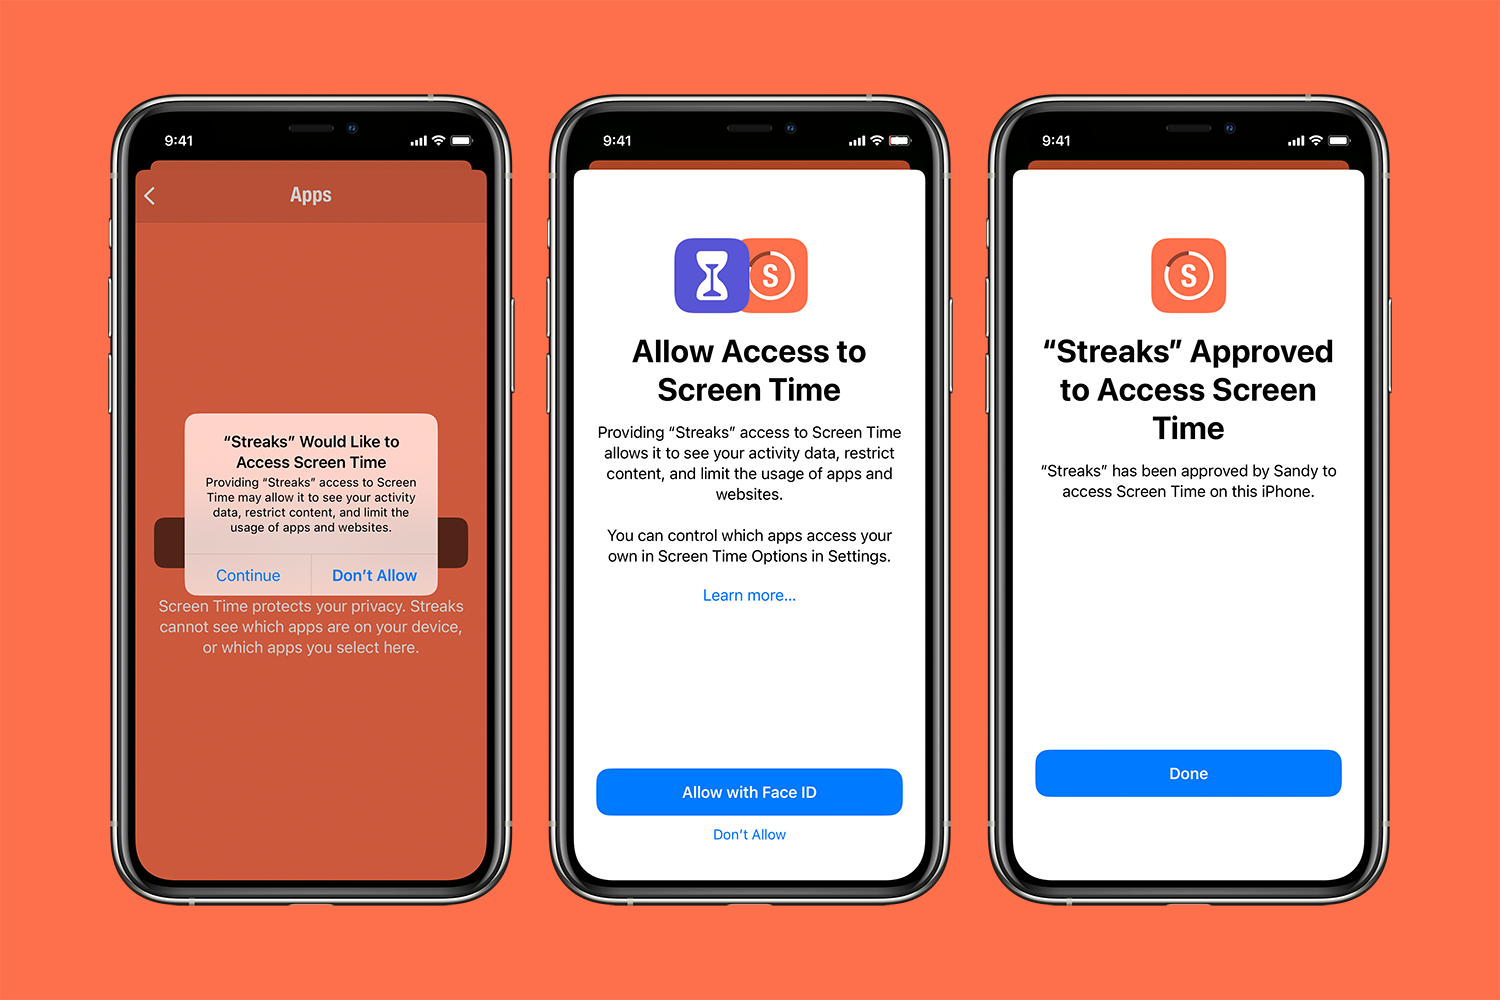
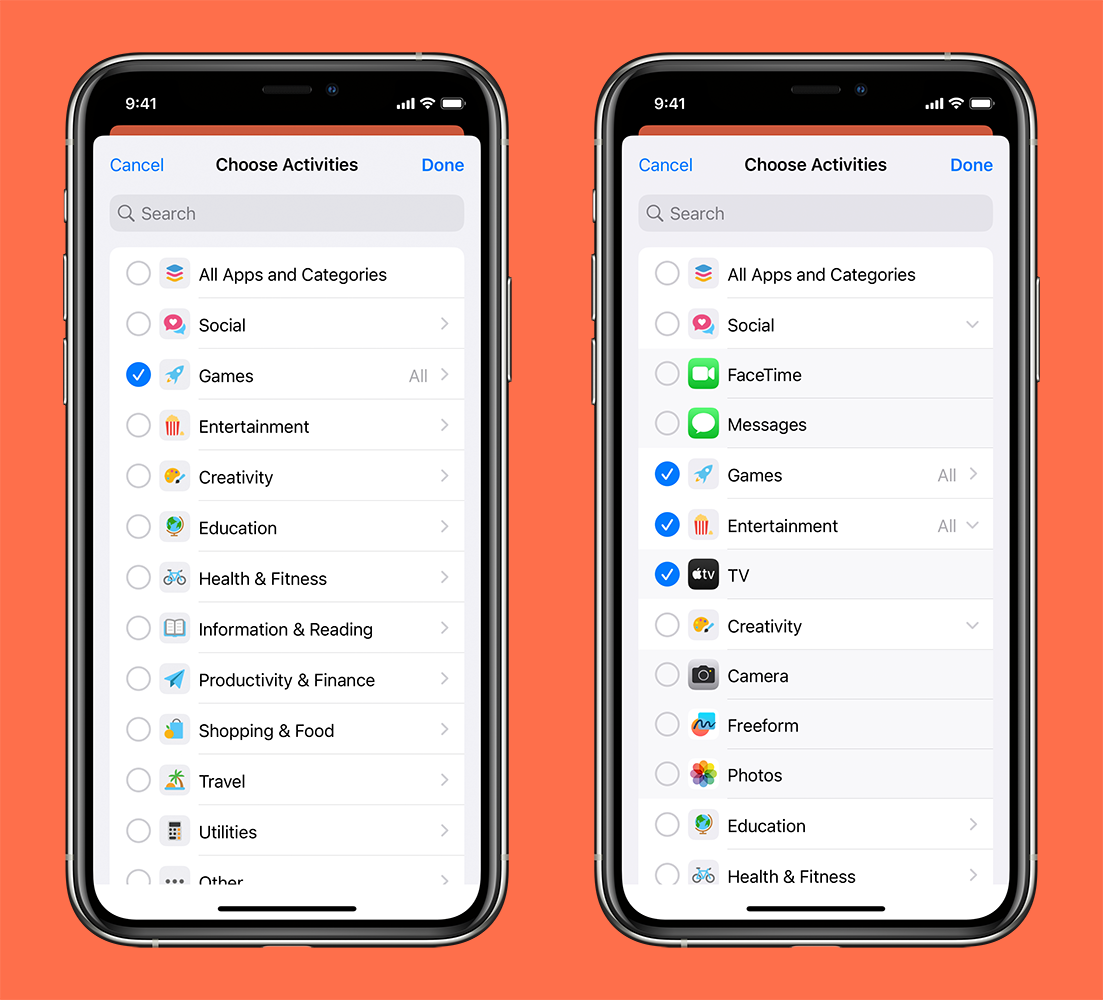
In the Streaks 9.1 update, we've added two new tasks: "Decrease Screen Time" and "Increase Screen Time", which work as follows:
- In the "Add Task" screen, you select either of these tasks
- You can then choose which app(s) they want to monitor
- Choose the maximum duration before Streaks determines the task is missed/complete
- Streaks will automatically be notified in the background by Screen Time when you reach the maximum duration.
The Screen Time framework was originally introduced as a way to allow parents to remotely control the usage of a child's device. In iOS 16 (2022), new functioanlity was added so the framework could also monitor the device it's running on (not just children's devices).
In order to add this functionality to Streaks, we did the following:
- Add the "Family Controls" entitlement to the app
- Add a new screen to the user choose apps and categories to monitor
- Create a "device activity" extension to receive background updates about device usage
- Start the activity monitor
This article shows how each of these steps were achieved using the iOS Screen Time framework.
Add Family Controls to the App
Firstly, you need to add the com.apple.developer.family-controls entitlement to your app. This can be done in the Signing & Capabilities section of the main app target.
Note: Family Controls is a privileged entitlement, meaning you must request permission from Apple in order to publish apps on TestFlight or the App Store that use it.
Once you've done this, your app can then request permission, as follows:
import FamilyControls

let ac = AuthorizationCenter.shared

Task {
    do {
        try await ac.requestAuthorization(for: .individual)
    }
    catch {
        // Some error occurred
    }
}
The call to requestAuthorization uses the .individual parameter, which means it is being used the manage the current device (not a child's device).

Selecting Which Apps to Monitor
To select one or more apps (or app categories) to monitor, you use the .familyActivityPicker modifier in SwiftUI. This picker is used to build a FamilyActivitySelection object, which contains the list of selected apps and categories.

First create a data model to store these settings:
class ScreenTimeSelectAppsModel: ObservableObject {
    @Published var activitySelection = FamilyActivitySelection()

    init() { }
}
Next, create the view to present the picker:
import SwiftUI

struct ScreenTimeSelectAppsContentView: View {

    @State private var pickerIsPresented = false
    @ObservedObject var model: ScreenTimeSelectAppsModel

    var body: some View {
        Button {
            pickerIsPresented = true
        } label: {
            Text("Select Apps")
        }
        .familyActivityPicker(
            isPresented: $pickerIsPresented,
            selection: $model.activitySelection
        )
    }
}
When the button is tapped, the picker is shown and the user can choose apps. Once they dismiss the picker, the FamilyActivitySelection value is updated.
Since Streaks primarily uses UIKit, we needed to bridge to this SwiftUI view using UIHostingController:
import UIKit
import SwiftUI

class SomeViewController: UIViewController {

    // ...

    let model = ScreenTimeSelectAppsModel()

    override func viewDidLoad() {
        super.viewDidLoad()

        let rootView = ScreenTimeSelectAppsContentView(model: model)

        let controller = UIHostingController(rootView: rootView)
        addChild(controller)
        view.addSubview(controller.view)
        controller.view.frame = view.frame
        controller.didMove(toParent: self)
    }

    // ...
}
This will embed the SwiftUI view in a UIKit view, which allows you to then open the app chooser.
Next, the selection must be saved. Also, a previously saved selected should populate the initial picker. To do that, we use the model.activitySelection variable.
import UIKit
import SwiftUI

class SomeViewController: UIViewController {

    // ...

    private var cancellables = Set<AnyCancellable>()

    // Used to encode codable to UserDefaults
    private let encoder = PropertyListEncoder()

    // Used to decode codable from UserDefaults
    private let decoder = PropertyListDecoder()

    private let userDefaultsKey = "ScreenTimeSelection"

    override func viewDidLoad() {

        // ...

        // Set the initial selection
        model.activitySelection = savedSelection ?? FamilyActivitySelection()

        model.$activitySelection.sink { selection in
            self.saveSelection(selection: selection)
        }
        .store(in: &cancellables)
    }

    func saveSelection(selection: FamilyActivitySelection) {

        let defaults = UserDefaults.standard

        defaults.set(
            try? encoder.encode(selection),
            forKey: userDefaultsKey
        )
    }

    func savedSelection() -> FamilyActivitySelection? {
        let defaults = UserDefaults.standard

        guard let data = defaults.data(forKey: userDefaultsKey) else {
            return nil
        }

        return try? defaults.decode(
            FamilyActivitySelection.self,
            data
        )
    }

    // ...
}
This code saves encodes the FamilyActivitySelection and saves it to UserDefaults.
Activate Usage Monitoring
To actually tell iOS to enable the app usage monitoring, you need to use DeviceActivityCenter.
import DeviceActivityFirstly, you need to define the timeframe over which you're monitoring. In Streaks, a user's task typically resets daily at midnight. This means we want a daily a shedule beginning at midnight:
let schedule = DeviceActivitySchedule(
    intervalStart: DateComponents(hour: 0, minute: 0, second: 0),
    intervalEnd: DateComponents(hour: 23, minute: 59, second: 59),
    repeats: true
)
Once you have a schedule, you then need to define an DeviceActivityEvent in order to specify which apps are to be monitored. This uses the app list saved earlier using .familyActivityPicker.
Additionally, here you also specify the threshold parameter, which is the maximum amount of time the apps can be used.
Note: In the case of Streaks, if the user passes that threshold, we mark the task as missed. The Screen Time framework also allows you to "shield" the app from the device user. That is, prevent them from using those apps.
let selection: FamilyActivitySelection = savedSelection()

let timeLimitMinutes = 30

let event = DeviceActivityEvent(
    applications: selection.applicationTokens,
    categories: selection.categoryTokens,
    webDomains: selection.webDomainTokens,
    threshold: DateComponents(minute: timeLimitMinutes)
)
Finally, you can start monitoring event using the defined schedule. You also need to determine names for the activity and the event.
We use the same DeviceActivityName regardless of the task, but we use the event name to uniquely identify which task in the app it belongs to.
In Streaks, you can have multiple screen time tasks, so we use eventName to differentiate between each task.import DeviceActivity
let center = DeviceActivityCenter()
// Stops existing monitoring. You may or may not need this
// depend on exactly what you're doing.
center.stopMonitoring()
let activity = DeviceActivityName("MyApp.ScreenTime")
let eventName = DeviceActivityEvent.Name("MyApp.SomeEventName")
try center.startMonitoring(
activity,
during: schedule,
events: [
eventName: event
]
)Device Activity Extension
Once the monitoring has begun, in order to receive updates from the system about the device usage, you need a "Device Activity" extension.
Adding this extension to your project creates a new class in your project that extends from DeviceActivityMonitor. There are a number of methods that can be overridden here, but in the case of Streaks, we're interested in eventDidReachThreshold.
When the user reaches the amount of time specified in the timeLimitMinutes variable above, this method is called in your extension.
import DeviceActivity

class MyMonitorExtension: DeviceActivityMonitor {
    override func eventDidReachThreshold(
        _ event: DeviceActivityEvent.Name,
        activity: DeviceActivityName
    ) {
        super.eventDidReachThreshold(event, activity: activity)

        // Do something once the user has used their device too much.
    }

    // ...
}
The specifics of what you do here really come down to what you're trying to achieve with your app. In the case of Streaks, this is where we then mark that task as missed for the day. To determine which day, we can retrieve the schedule for activity:
let schedule = DeviceActivityCenter().schedule(for: activity)
let nextInterval = schedule?.nextInterval
One other thing we do in Streaks is to provide a warning notification to the user so they know if they're approaching their time limit threshold. To do this, we pass the warningTime parameter to the schedule.
This code defines a one minute warning:
let schedule = DeviceActivitySchedule(
    intervalStart: DateComponents(hour: 0, minute: 0, second: 0),
    intervalEnd: DateComponents(hour: 23, minute: 59, second: 59),
    repeats: true,
    warningTime: DateComponents(minute: 1)
)
Now, because warningTime has been specified, the eventWillReachThresholdWarning method will be called, allowing you to warn the user:
import DeviceActivity

class MyMonitorExtension: DeviceActivityMonitor {
    // ...

    override func eventWillReachThresholdWarning(
        _ event: DeviceActivityEvent.Name,
        activity: DeviceActivityName
    ) {
        super.eventWillReachThresholdWarning(event, activity: activity)

        // Notify the user that they're approaching the time limit

        let schedule = DeviceActivityCenter().schedule(for: activity)
        let warningTime = schedule?.warningTime

        // ...
    }
}
One important thing to note about this type of extension is that it has a hard memory limit of 5 MB. This means if you do too much work, the extension will be terminated, resulting in a Jetsam crash report.
Summary
This article shows how we added support for Screen Time in Streaks. While we're using Screen Time in a different. There are many other functions you could add with this framework, but hopefully this has given some insight of how to achieve a basic usage monitor.
See also:
- Screen Time (Apple Developer Documentation)
- Meet the Screen Time API (WWDC 21)
- What's New In Screen Time API (WWDC 22)